Visit
Official Website

Muser Apac Sdn Bhd
V Office 2, VO2-03-12,
Lingkaran SV,
Sunway Velocity,
Jalan Peel,
55100 Kuala Lumpur,
Malaysia.
+603-2742 7468

6000 CO2 Piercing Device

Previous 1 / 3 Next

Quantity
Add Quotation


Part #6000 CO2 Piercing Device
 
CO² Testers for Cans & Bottles
 
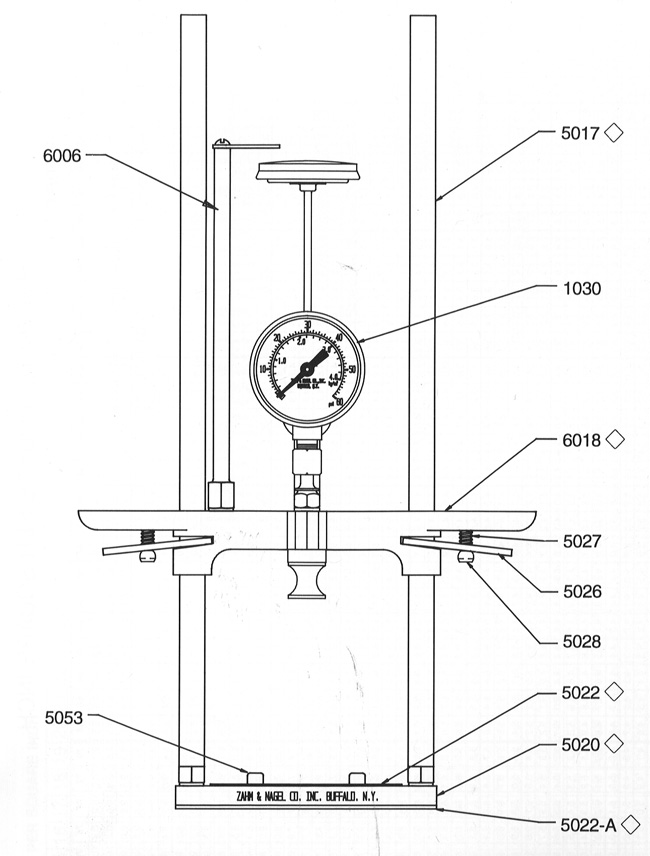
The Zahm Model D.T. Piercing Device is used to test carbonated beverages for volumes of CO² gas in glass/PET bottles and cans. This instrument uses a dual scale pressure gauge (0-60 psi & 0-4.2kg/cm2) and an adjustable 2″ dial thermometer (25/125ºF & -5/55ºC). It is available in one and three liter sizes. The Series 6000 Piercing Device will provide rapid and accurate determination of gas volumes in alcoholic and non-alcoholic beverages when used with the two pressure/temperature charts furnished with the instrument.
 
 
Operating Instructions
 

Caution: EYE PROTECTION MUST BE WORN WHILE OPERATING THIS INSTRUMENT

The instrument is ready for product testing as received from the factory but several checks should be made in order to assure that none of the fittings leak when testing is being performed.
  1. Apply a small amount of “O” ring lubricant to the dial thermometer stem (6003) and work it up and down to lubricate the “O” ring (6008). “O” ring lubricant may be purchased from Zahm & Nagel.
  2. Pressurize the instrument and apply a soapy water solution to all fittings. The formation of bubbles will show any leakage and the condition can then be corrected. The instrument may also be pressurized and submersed in an aquarium filled with water and bubbles observed in this manner.
 
 
Volumes Of CO2 Gas Dissolved In Water Chart
Solubility Of Carbon Dioxide In Beer Chart – Pressure-Temperature Relationships
 
TO OPERATE:
  1. Close the Whitey TM valve (5056) and depress the lock plates (5026) while pulling up on the cross bar (6018) to a height that will clear the top of the container being tested.
  2. Release the lock plates and the cross bar will remain in that position until the operator is ready to pierce the container.
  3. Raise the dial thermometer (6003) so that it touches the dial thermometer stop (6006).
  4. Place the can to be tested upside-down on the base pad (5022) and center so that the rubber seal (6013) will line up approximately in the center of the container. Bottles could be tested by piercing through the crown.
  5. Depress the lock plates and lower the cross bar to a point where the rubber seal just touches the top of the container.
  6. Continue to depress the lock plates and with both hands push the cross bar rapidly downwards until the container is pierced.
  7. Release the lock plates. The cross bar will remain locked in place with the rubber seal compressed to prevent leakage at the point of piercing. Be careful not to trip the lock plates after piercing as only a slight upward pressure on the lock plates will release the cross bar.
  8. Hold the instrument at the bottom of the base with the right hand while the left hand holds both the guide rod (5017) and the dial thermometer stop (6006). Shake the instrument with a rapid back and forth motion until maximum gauge pressure has been obtained. Record this pressure for future chart calculations of CO² gas volumes.
  9. Insert the dial thermometer down into the container to its fullest extent and leave it there until a steady temperature is obtained. The time required for a steady temperature reading may be thirty seconds or longer, depending on the temperature of the product being tested. Record this temperature for future chart calculations of CO² gas volumes. Note: DO NOT record pressure readings when the dial thermometer is inserted into the container. This will cause a false pressure reading and resulting error in the number of volumes of CO² gas.
  10. When the pressure and temperature have been recorded, refer to the correct pressure/temperature relationship chart. Be sure to refer to the correct chart when determining the volume of CO² gas. Charts for both alcoholic and non-alcoholic beverages accompany the instrument.
  11. After the test has been completed bleed off the pressure in the container by slowly opening the Whitey valve. To prevent the product from spraying the operator a piece of plastic tubing should be attached to the hose nipple (5057) of the Whitey valve and the product drained into a sink or suitable container.
  12. Withdraw the dial thermometer until it touches the dial thermometer stop.
  13. Depress the lock pates and raise the cross bar to clear the container.
  14. Close the Whitey valve and remove the container. The instrument is now ready for the next container to be tested.
 
 
Care of Instrument
 
After the tests have been completed the instrument should cleaned and checked as follows:
  1. Backflush the piercing assembly system with warm water. To do this, attach a hose to a water supply and then to the Teflon nipple of the Whitey valve. Open the Whitey valve and allow the water to flush through the system for several minutes.
  2. Rinse the entire instrument with warm water and dry with a soft towel.
  3. Check the dial thermometer for accuracy (re-calibration instructions are shipped with the instrument). Before installing the dial thermometer, apply a small amount of “O” ring lubricant to the stem and work the thermometer up and down to lubricate the internal “O” ring.
  4. Check the pressure gauge for accuracy (re-calibration instructions are shipped with the instrument). Be sure to install gauge gasket in the gauge adapter before the pressure gauge in installed on the instrument.
 
Note: All replacement parts for the 6000 series are the same as used on the Zahm New Style Air Tester 5000 Series except for parts #6003 through #6018 as listed on the parts list.
 
 
Parts


6001 CO² Tester Complete W/#6003 Dial Thermometer & #1030 Pressure Gauge 5027 Lock Spring (2 Req’d)
6003 Dial Thermometer 2″ Dial, Dual Scale (25/125 F -5/55 C.) 8″ Long Stem, Adjustable 5028 Lock Screw (2 Req’d)
6006 Dial Thermometer Stop 5038 Gasket
6007 Dial Thermometer Adapter 5039 Gasket Adapter
6008 Adapter “O” Ring 5040 Gauge Gasket
6009 Adapter Nut 5043 Packing Nut
6011 Piercing Needle .703 OAL of Piercing Point 5044 Nut Gasket
6013 Rubber Seal 5053 Can Stop (2 Req’d)
6018 Cross Bar For 1 Litre Size 5055 Whitey Valve
5017 Guide Rod 5056 Whitey Valve Complete with #5057 and #5058
5020 Base 1 Litre Size 5057 Hose Nipple
5022 Base Pad (Top) For 1 Litre Base 5058 Nipple Nut
5022-A Base Pad (Bottom) For 1 Litre Base 1030 Pressure gauge, 2″ dia. (Dual scale 0-60psi & 0-4.2kg/cm2) 1/8 NPT lower male connection
5026 Lock Plate (2 Req’d)    
 
 
Charts


Video Tutorials


Please leave your enquiry here, we will reply as soon as possible.
Name*  
Company Name  
Product Interested  
Quantity  
Email*  
Contact No.*  
Messages*  
   

You have 0 items in you cart. Would you like to checkout now?
0 items
available in